Practical guide
Repairing Render Before a Colour Change
A new colour only looks good, and lasts, on render that is sound, clean and dry. Cracks, hollow patches and algae have to be dealt with first, repairs need to cure, and only then does the coating go on. This article sets out that order and explains why a fresh colour cannot always hide a repair.

On this page
One colour does not make one surface
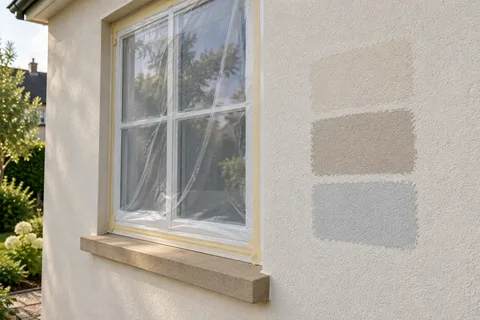
Paint evens out colour but not shape. A raised patch still catches light differently from its surroundings, and a rougher repair still reads as a separate area under a uniform coat. Knowing this before choosing a colour avoids judging the finished wall against something a coating cannot do.
That does not make local repairs a poor choice. They are often the right treatment for a defined defect, and a well-matched texture can make them hard to spot. If a uniform surface is the priority, ask whether a skim of new finish over the repaired wall is possible before it is coated, and treat that as a separate option.
Where repair visibility matters most, ask for a sample of the coating over a repaired area, not only on untouched render.

Tap-test the walls and mark cracks, hollow patches and stains.
Fix the causes: gutters, downpipes, sills, render over the DPC.
Treat algae, wash the walls and let them dry.
Cut out and rebuild hollow areas; fill cracks.
Let repairs cure fully, then prime and apply the coating.
Repairs and coating have different finishing points
A repair can look dry long before it is ready to coat. Cement patches go on in coats, each left to firm; K Rend, for example, normally allows 24 hours between its base coats and asks for its base coats to stand at least 14 days before its silicone finish. Coating too early can trap moisture in the patch and leave it a different shade from the wall around it. The specified coating has its own requirements too, set out on its data sheet.
Building repairs can sit between the two stages. A downpipe or sill that caused the damage needs fixing before the wall is coated, or the new colour will be streaked again within a season.
Two lists: condition and appearance
Make one list for condition: cracks, hollow-sounding areas, loose patches, damage at the base, and stains with their likely sources. Make a second for appearance: the colour, which walls are included, and features that stay unpainted. The first list is about what the wall needs; the second is about what you want. Keeping them apart stops the colour choice pushing repairs off the list.
How the repairs are done
Hollow areas are cut back to firm render with straight edges, the masonry repaired, and the patch rebuilt in matching coats so it finishes flush. Cracks in sound render are raked out and filled with a material compatible with the render. On lime render, the repair is made in lime, and the coating is limewash or a breathable silicate paint rather than modern masonry paint, as Mike Wye and SPAB both advise.
Cleaning before coating
Algae and dirt are killed and washed off before any primer or coating. K Rend's maintenance advice for its finishes is a warm wash with a suitable detergent at a pressure low enough not to damage the render, plus a fungicidal wash on walls that stay wet, and it notes that power washing does not suit dry dash. The wall must then dry before it is coated.
Choosing and testing the coating
Tell the contractor what you know about the existing render and any previous paint. Cement render generally takes masonry paint; K Rend says its own render is a suitable surface for it. Silicone and silicate coatings have their own primers and rules. A trial area on the repaired wall shows both the colour and how well the repairs blend.
Fittings and protection
Decide what happens to pipes, vents, lights and frames: removed and refitted, masked, or painted to match. Mark it on a photograph of each wall. Spray coating drifts, so glazing, paving, cars and plants nearby need sheeting, and the work needs dry weather above the coating maker's minimum temperature.
A worked example
Imagine a hypothetical 1960s semi with grey painted render that the owners want to change to a warm white. Tapping finds two hollow patches under the bathroom window, where an overflow pipe has dripped for years, and a crumbling strip along the base where the render runs into the patio.
The overflow is redirected first. The patches are cut back to sound render, the brick behind is dried and repaired, and the patches are rebuilt in two coats. The base of the render is cut back above the DPC and finished on a new bead, with the patio edge lowered slightly so it no longer bridges it. The walls are treated for algae, washed and left to dry, the repairs are given their curing time, and only then are the walls masked, primed where needed and sprayed.
The new colour goes on a wall with no hidden problems. The two patches may still be faintly visible in low raking light, but they will not crack through the coating in the first winter, which is what usually happens when a colour change goes on first.
The record
Photograph the repairs before they are coated and note where they are, with the coating name and colour reference. Under a uniform colour, nobody will see them again, but if a crack reappears in the same place the record shows it was repaired before. The Rotherham rendering homepage links the repair and respray services.
Common questions
Can I paint over cracks and fix them later?
It is a false saving. Coating over cracks and hollow patches seals water in behind them and the paint will fail first at those points. Repair first, let the repairs cure, then coat.
Will a thick masonry paint fill fine cracks?
It may hide hairline crazing for a while, but it will not hold together render that has cracked through or come away from the brick. Those areas need repairing before any coating goes on.
How long should I wait between repairs and spraying?
Until the repair materials are fully cured and the wall is dry, which depends on the products and the weather. Follow the data sheets for both the repair render and the coating; in cold, damp weather that can mean waiting well beyond the minimum.
Do repairs need priming before the new colour?
Often they do, because fresh render and old painted render absorb coating differently, and an unprimed patch can show as a dull or dark area. The coating maker's data sheet says whether a primer or stabiliser is needed on new render, on old paint, or on both, and how long each must dry.
See housing and planning information for Rotherham and nearby places, including the source and geography behind each figure.